Key Takeaways
-
Follow a systematic 7-step troubleshooting process: define scope, inspect visually, reseat/swap cables, check device and switch port, test with appropriate tools, repair or replace, then retest and document.
-
A cable can pass continuity tests but still fail due to performance issues; measure insertion loss, return loss, crosstalk, and delay skew using certification-level testing, not just wiremap tests.
-
Most cable problems are caused by loose connectors or worn patch cords, not broken cables inside walls; reseat both ends and try a known-good patch cord before assuming internal damage.
-
For PoE devices that reboot or fail to power on, check the switch power budget, port support, cable resistance, and port negotiation status, as basic wiremap tests miss power-delivery problems.
-
Fiber connector cleanliness is critical; dirty connectors are a top cause of fiber trouble, so inspect and clean properly before testing with optical power meters or OTDRs.
-
Always retest fixes with the same tool used to find the fault, verify expected link speed and stable service, and document all details including fault, action, results, and cable identifiers for future reference.
It is Monday morning. A phone will not ring, a camera feed keeps dropping, and one desk has no internet at all. Sound familiar? Cable problems love to show up at the worst possible time. The good news is that most of them can be tracked down with a calm, step-by-step plan.
This cabling troubleshooting guide walks you through that plan in plain language. You will learn how to spot the problem, test copper and fiber cables, handle Power over Ethernet (PoE) trouble, and prove your fix actually worked. Whether you run a small office, manage IT for a growing company, or oversee several franchise locations, these steps will help you get back to work faster.
Think of it like being a detective. You gather clues first, then you test your theories one at a time. No guessing, no panic. Let’s get started.

Start With the Basics: What Kind of Problem Do You Have?
Before you touch a single cable, ask a few simple questions. Good answers can save you an hour of poking around.
- What type of cable is involved? Is it copper Ethernet, fiber, or something else?
- What is affected? Look at the exact device, switch port, patch panel, and service (phones, internet, cameras, door readers).
- Is it one spot or many? One desk points to a local cable or port. A whole floor points to a switch or backbone link.
- What changed recently? Moves, new furniture, ceiling work, or a power outage often explain sudden trouble.
Write your answers down. This small habit keeps you focused and gives your support team a clear starting point if you need to escalate.
A Simple Cabling Troubleshooting Guide: The 7-Step Process
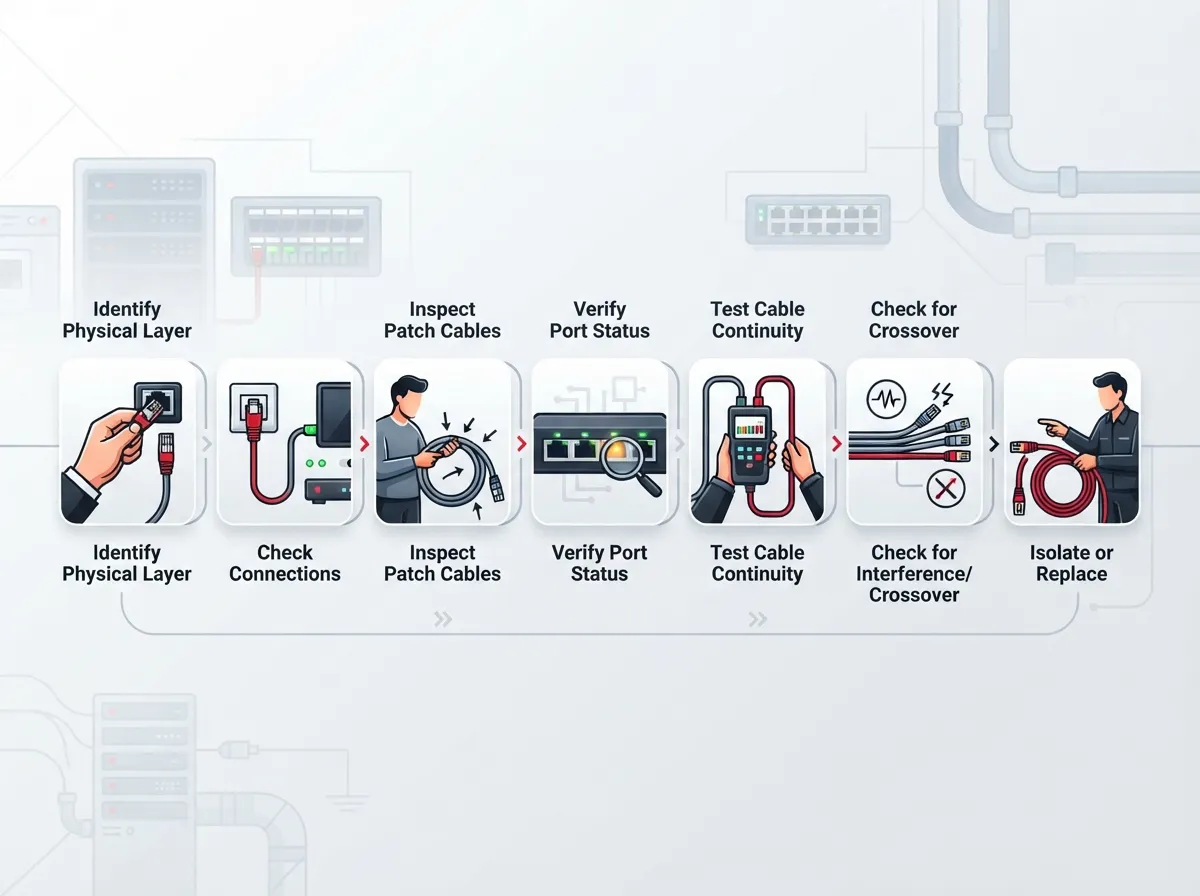
Here is the repeatable process we recommend for almost any physical-layer problem. Work through it in order.
- Define the scope. Note who and what is affected, and when the trouble began.
- Inspect the obvious. Check both ends of the cable, the patch cord, and the wall jack.
- Reseat and swap. Unplug and firmly re-plug each end. Then try a known-good patch cord.
- Check the device and switch port. Look at link lights, port status, and speed settings.
- Test with the right tool. Use the media-appropriate tester for copper, fiber, or PoE.
- Repair or replace. Fix the termination, replace the damaged section, or re-route the cable.
- Retest and document. Prove the fix works and record what you did.
Steps 2 and 3 solve a surprising number of problems. A loose connector or a tired patch cord is far more common than a broken cable inside the wall.
Step 1 and 2: Inspect Before You Test
Your eyes are a great first tool. Walk the cable path from the device to the patch panel and look for clues.
What to Look For
- Cracked or loose connectors
- Cables that are crushed under furniture or pinched in doors
- Tight bends or sharp kinks
- Large, tightly strapped bundles that squeeze the cables
- Poorly terminated wires with too much untwisted length at the jack
- Missing, wrong, or faded labels
Check that the patching matches your records. A cable plugged into the wrong port on the patch panel can look like a dead line. Clear labels make this check quick, which is one reason good structured cabling documentation pays off over time.
How to Troubleshoot Copper Ethernet Cables
Copper twisted-pair cable is the most common type in offices, so let’s spend some time here.
Check the Link Light First
If a port shows no link light, the connection is not completing. Reseat both ends, try a different patch cord, and try a different port. If a known-good device works on the same cable run, the problem is likely the original device. If it still fails, the cable or the port needs a closer look.
Start With a Wiremap Test
A basic wiremap test checks that each of the eight wires connects to the right pin. It can find:
- Opens (a broken wire)
- Shorts (wires touching)
- Reversals and crossed pairs (wires on the wrong pins)
- Split pairs (wires from different pairs paired together)
Here is the catch. A wiremap test only tells you the wiring is connected correctly. It does not tell you the cable performs well enough to carry fast network traffic. That is why a cable can show perfect continuity and still run slowly or drop connections.
Know the Distance Limit
Twisted-pair Ethernet is commonly designed around a 100-meter channel. That is typically up to 90 meters of permanent cable in the wall plus up to 10 meters of patch cords. Confirm your standard, channel setup, and Ethernet application before you blame distance, but if a run is stretched past this limit, expect weak or unstable links.
Verification, Qualification, or Certification: Which Test Do You Need?
Many people use these words as if they mean the same thing. They do not. The right level of testing depends on your goal.
| Test Level | What It Does | Best Used When |
|---|---|---|
| Verification | Finds continuity and wiring faults such as opens, shorts, and miswires | Quick checks and first-line troubleshooting |
| Qualification | Shows whether a link can support a specific network speed or technology | Before upgrading equipment or speeds |
| Certification | Measures required cabling parameters and reports compliance with a TIA category or ISO class | New installs, warranty needs, and stubborn performance problems |
For everyday fixes, verification is often enough. For ongoing slowdowns or new installations, certification gives you proof. If you are curious about the bigger picture of cabling design, our guide to what structured cabling is for your business network is a helpful read.
Why a Cable Can Pass Continuity but Still Fail
This is one of the most common head-scratchers. The wiremap looks fine, yet the link runs at a lower speed or drops out. Usually the cause is a performance problem, not a wiring problem.
Copper certification testing measures more than continuity and length. Depending on the standard, it can include:
- Insertion loss: how much signal strength is lost along the cable
- Return loss: how much signal bounces back from imperfections
- NEXT and power-sum NEXT: crosstalk, or signal leaking between pairs
- Delay and delay skew: timing differences across the pairs
Poor terminations, damaged cable, too much untwisted wire at a connector, or mismatched components can all hurt these numbers. Even when every wire is in the right place, the link may not meet its category performance. For more on how cable type affects results, see our look at the key differences between CAT5e and CAT6 cabling.
How to Troubleshoot Fiber Optic Links
Fiber works differently from copper, so the checks are different too. Here is a friendly checklist for a fiber link with no light or low receive power.
- Confirm compatibility. Make sure the optics, fiber type, wavelength, connector, and speed all match on both ends.
- Inspect and clean connectors. Dirty connectors are a top cause of fiber trouble. Use proper inspection and cleaning procedures.
- Check seating and polarity. A transmit fiber should connect to a receive port. Crossed polarity can look like a dead link.
- Review transceiver diagnostics. Many modules report transmit and receive power and any alarms.
- Test the link. Use an optical power meter and light source to measure insertion loss.
- Locate faults on long runs. An OTDR can help find events along longer or backbone links.
Fiber is less forgiving of dust than most people expect. A quick, careful cleaning solves many problems before any test gear comes out. If you are weighing media options for a build or upgrade, we cover the choices in how to choose fiber cabling for your business network.
Troubleshooting PoE Devices That Reboot or Won’t Power On
Power over Ethernet sends both data and power down one cable. It is great for VoIP phones, wireless access points, and security cameras. It also adds a few new things to check.
Common PoE Checks
- Power budget: Does the switch or injector have enough total power left for every device?
- Standard support: Does the switch port support what the device needs? PoE types and classes vary, with some using two pairs and others using four.
- Port status and negotiation: Check whether the port is detecting the device and granting power.
- Cable condition: Resistance and resistance imbalance in the cable can reduce power delivery.
A basic wiremap test may not catch a power-delivery problem. If a camera keeps rebooting or a phone says it has insufficient power, you may need measurements beyond a simple continuity check. Long runs and damaged cable are frequent suspects. If you are running many cameras, our post on camera wiring mistakes that cost Tampa businesses shares what to avoid.
Tracking Down Intermittent Connections
Intermittent problems are the trickiest. The link works, then it does not, then it does again. Try this approach:
- Note exactly when the drops happen. Is it at certain times of day or when something nearby turns on?
- Wiggle-test the connectors gently while watching the link light.
- Check for cables running near power lines, fluorescent light ballasts, or heavy machinery.
- Review the switch port for rising error counters.
- Swap the patch cords at both ends with known-good ones.
- If the problem remains, run a performance-level test on the permanent link.
Intermittent faults often trace back to a weak termination, a stressed connector, or a cable that was bent too tightly during install. These details matter, which is why common structured cabling mistakes are worth knowing about before they bite.
After the Fix: Retest and Document
Many people skip this step, and it costs them later. A fix is not finished until you prove it works.
- Retest the repaired link with the same tool you used to find the fault.
- Confirm the expected link speed and stable service.
- Check interface error counters and PoE status if relevant.
- Record the details: the fault, the corrective action, the test results, and the cable and port identifiers.
Good records make future moves, adds, and changes much easier. They also help if you need to escalate to a vendor or a contractor. Franchise operators with several sites especially benefit from keeping the same documentation style at every location.
When to Call in a Cabling Professional
Some jobs are worth handing off. Consider calling a pro if:
- Failures keep returning after you replace patch cords
- You suspect damage inside walls or ceilings
- You need certification-level test reports
- A new office build-out, move, or expansion is coming up
- You manage several locations and want consistent standards
Ideal Solutions Provider is a Tampa-based telecom and IT partner with more than 24 years of experience. We handle structured cabling alongside VoIP, internet, networking, cloud security cameras, and access control, so you have one team to call instead of juggling vendors. Learn more about our structured cabling services, or read about DIY versus professional cabling for Tampa offices to see which route fits your situation.
Quick Reference: Symptom to First Check
| Symptom | Likely Cause | First Thing to Try |
|---|---|---|
| No link light | Loose connector, bad patch cord, wrong port | Reseat both ends and swap the patch cord |
| Works but runs slow | Poor termination or damaged cable | Check speed settings, then test performance |
| Drops in and out | Stressed connector, interference | Inspect the path and check error counters |
| PoE device reboots | Power budget or cable resistance | Check switch power budget and port status |
| Fiber shows low power | Dirty connector or wrong polarity | Clean and reseat, then check diagnostics |
Keep Your Network Healthy for the Long Run
The best troubleshooting is the kind you never have to do. A little prevention goes a long way:
- Label every cable, port, and panel clearly
- Avoid tight bends and over-tight bundling
- Use quality patch cords and replace worn ones
- Keep fiber connectors capped and clean
- Schedule a periodic check of key links and closets
Slow connections are not always a cabling issue, so it helps to know what else to rule out. Our guide on why business internet is slow and how to fix it covers the wider picture.
Final Thoughts
Cable trouble feels scary, but a steady process turns it into a puzzle you can solve. Define the problem, inspect first, test with the right tool, fix it, and then retest and document. Follow this cabling troubleshooting guide each time and you will find faults faster and prevent repeat headaches.
If you would rather have an experienced team on your side, we are happy to help. Contact us for a free consultation, or call us at 813-388-4935 to talk through your cabling, phone, internet, and security needs. You can also follow our updates on Facebook. Your network should work for you, not the other way around.
FAQs
Q: Why does an Ethernet cable show continuity but still fail or run slowly?
A: Great question! A basic wiremap test only confirms the wires connect to the right pins. It does not measure performance, so poor terminations, damaged cable, or too much untwisted wire can still cause slow speeds or drops even when continuity looks perfect.
Q: What is the difference between cable verification, qualification, and certification?
A: Verification finds basic wiring faults like opens and shorts. Qualification checks if a link can support a certain network speed, and certification measures required parameters and reports compliance with a TIA category or ISO class.
Q: What is the maximum recommended Ethernet cabling distance for a business network?
A: Twisted-pair Ethernet is commonly designed around a 100-meter channel, usually up to 90 meters of permanent link plus patch cords. Always confirm the standard, channel setup, and Ethernet application for your specific case.
Q: How do I troubleshoot a business network port with no link light?
A: Start by reseating both cable ends and swapping in a known-good patch cord. Then try a different port, confirm the patching matches your labels, and check the device and switch port status before testing the cable itself.
Q: How do I diagnose PoE devices that reboot or fail to power on?
A: Check the switch or injector power budget, port status, and whether the port supports what the device needs. Cable resistance and damage can also reduce power delivery, so you may need tests beyond a basic wiremap check.